Using Calendly
Set your availability so no one can book you at the wrong time
Learn how to set up your availability with Calendly — no more double bookings or midnight meetings.
Rachel Burns
Mar 10, 2023
10 min read
Table of contents
Calendly makes it easy to customize exactly how and when people can book meetings with you. Setting up your availability when you first get started with Calendly will pay off in time savings and peace of mind once you start booking meetings.
To determine when people can book with you, Calendly looks in three places:
Your connected calendars: This is how Calendly ensures you don’t get double-booked over a previously scheduled event.
The schedule(s) you set in your availability settings: This is where you establish general preferences for when people can book with you.
Settings within each Event Type: This is where you set rules for when specific kinds of meetings can be scheduled.
In this guide, we walk through how to set up all three in your Calendly account. Follow the steps below to connect your calendars, set your default schedule, customize availability for different Event Types, and test the experience from start to finish.
By the end, you'll be ready to share your scheduling link with confidence — no worrying about double bookings or accidental midnight meetings!
1. Connect all of your calendars to check for work and personal conflicts
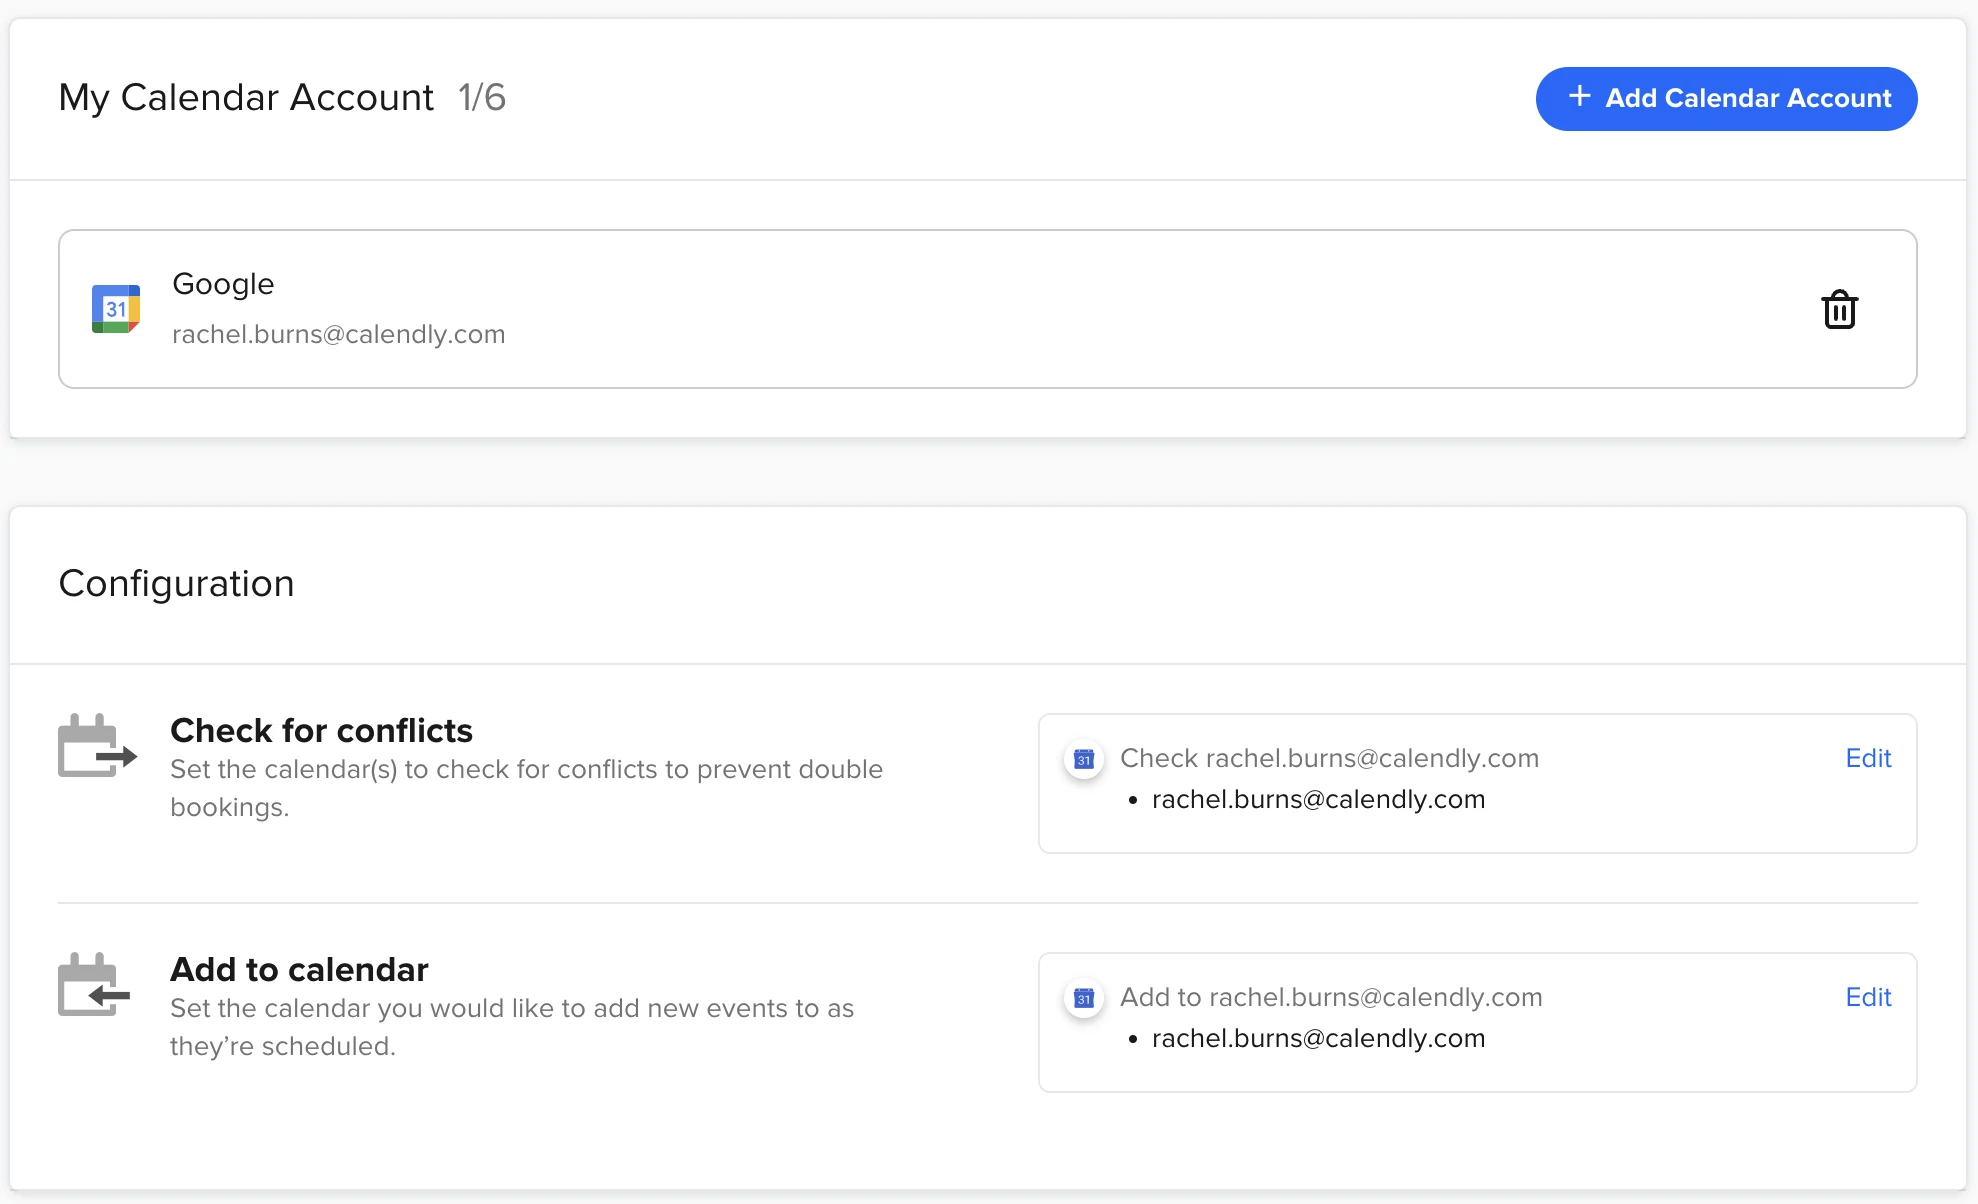
Between work and your personal life, you likely have different calendars that make up your full schedule. You can connect additional calendars to your Calendly account to check for conflicts and guarantee you’re never double-booked over personal appointments or professional meetings.
When you connect all of your calendars to Calendly, the app looks at your complete schedule and only shows your open time slots on your booking page, so you don’t need to check your calendars manually for scheduling conflicts.
Hot tip
Calendly's free plan lets you connect one calendar to your account. When you need the flexibility to add more, you can connect up to six calendars on all paid plans.
Need more help? Read this help center article about how to use multiple calendars.
Prevent scheduling during holidays, vacations, and time off
Whether you're going on vacation or observing a holiday, we want to help protect your well-deserved time off. There are three ways to ensure you're only booked when you want to be:
Add a busy event to a connected calendar. (Learn how in this help center article.)
Add date-specific hours in your Calendly availability settings.
Use Calendly’s default holidays feature.
As a rule of thumb, if you won't be working or taking meetings at all, it's best to add your time off as an event on your connected calendar.
Another great reason to connect multiple calendars: when you’ve already put your time off on one of your calendars, you don’t have to worry about manually adding date overrides to your Calendly schedule.
If you don't want to create an event on your connected calendar, but still want to stop people from scheduling with you through Calendly on specific dates, you can add date-specific hours (formerly called overrides) to your Calendly schedule(s).
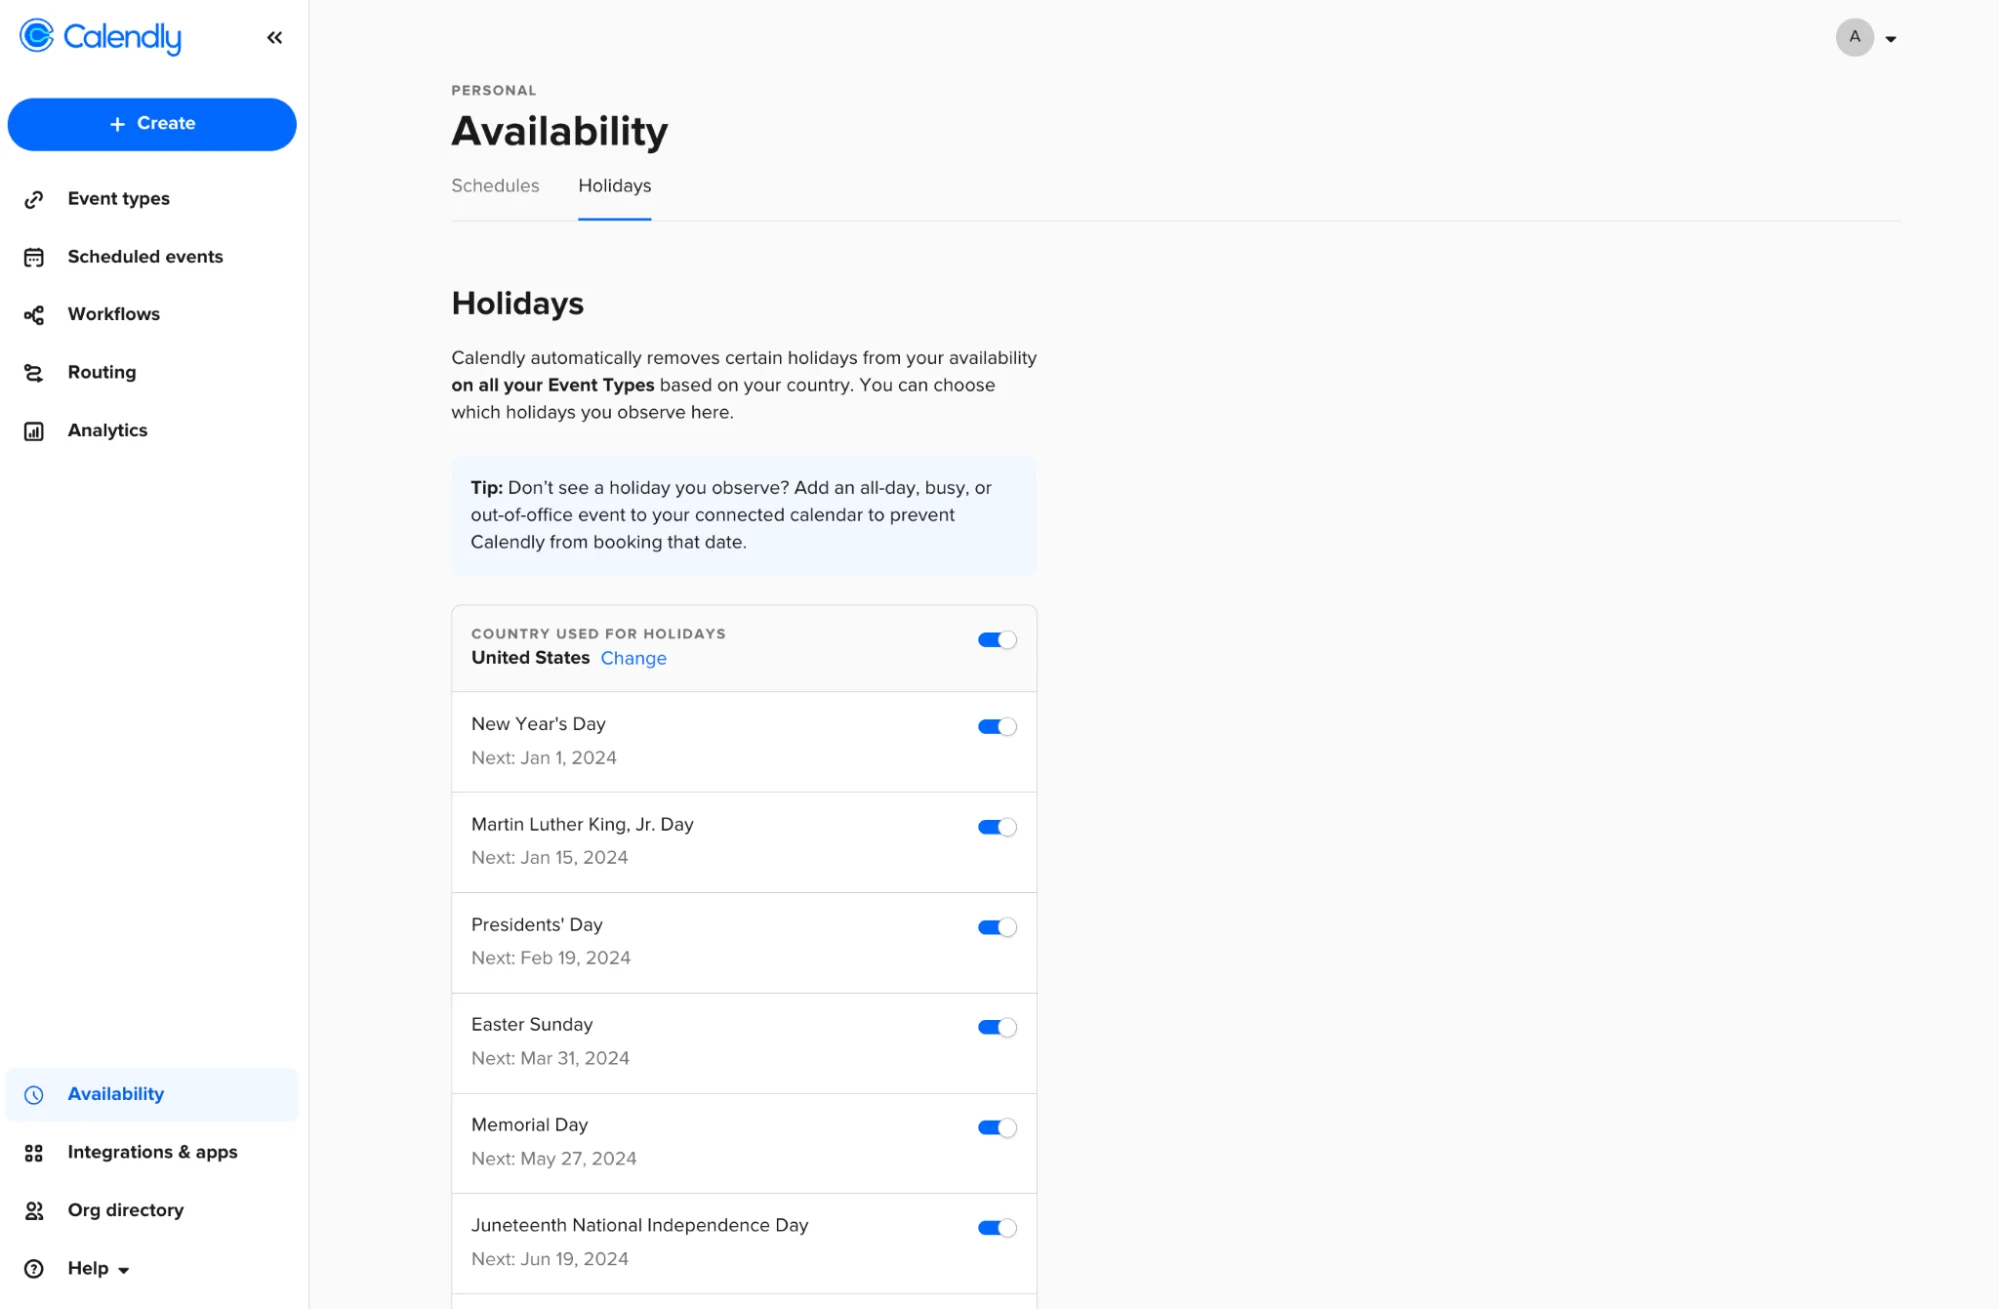
Calendly’s default holidays feature automatically blocks bookings on major holidays in your country, so you can protect your time. Default holiday lists are currently available for ten countries, and you can choose which holidays you want to block scheduling on from your Availability settings.
If you don’t see a holiday you observe, use date-specific hours or add an all-day/out-of-office event to your connected calendar to prevent Calendly from booking on that day. Learn more about best practices for date overrides, vacations, and time off in this help center article.
2. Set up your daily schedule in the Availability tab
Setting up your default schedule within Calendly is a great way to avoid meetings after working hours (or before you’ve had your morning coffee).
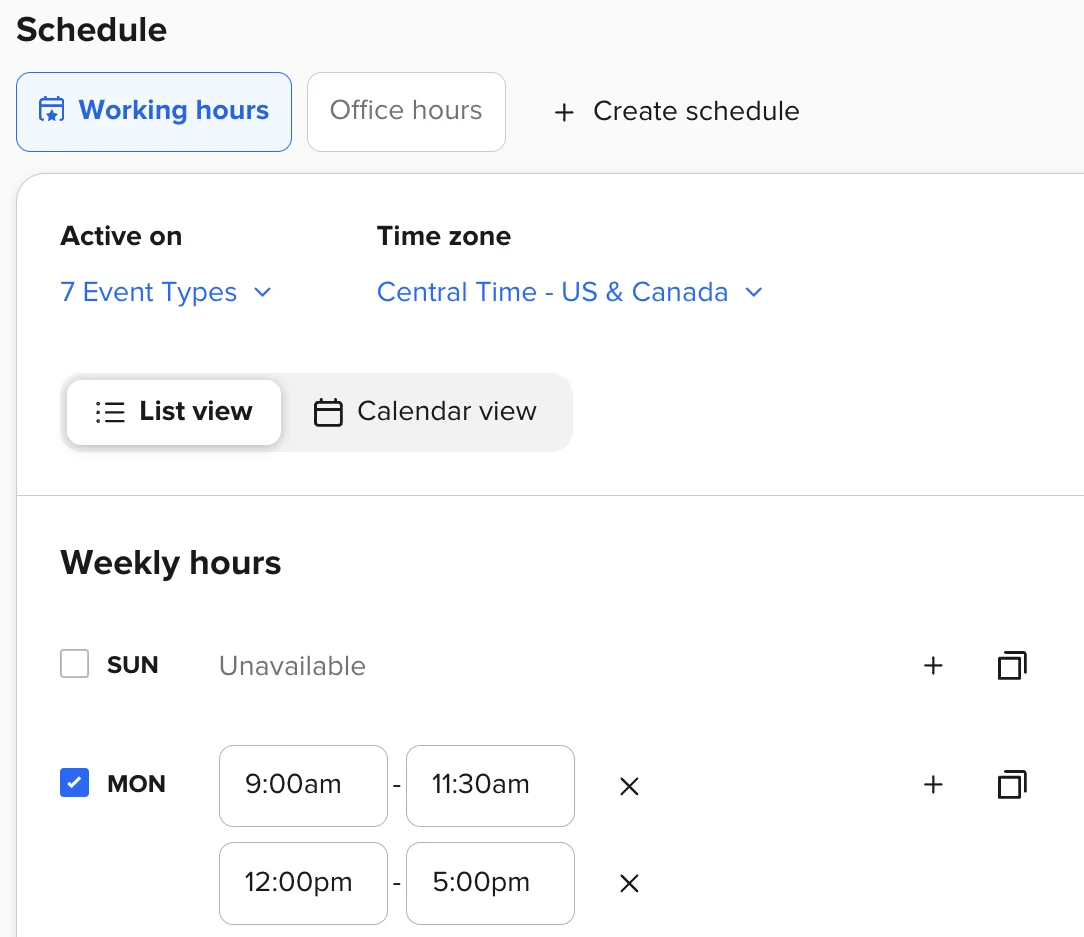
From your Calendly home page, go to the Availability tab in the left-hand sidebar. Here, you can create a new schedule or edit your default working hours. Within each day, you can add multiple intervals. Intervals ensure you won't be booked on your lunch break or during that daily mid-afternoon walk.
Learn more about setting up Calendly schedules in this help center article.
Hot tip
Need to schedule a VIP meeting outside of your usual hours? Hand-pick times for unique scenarios with one-off meetings and the Customize Once and Share feature.
3. Customize availability for each Event Type
The next place Calendly looks to determine whether you’re free is in the settings for each Event Type. Only want to offer coffee chats in the morning, and save your afternoons for interviews? That's where Event Type settings come into play.
To get started, go to your Calendly homepage and click on the Event Type you want to edit. Here we'll focus on settings that impact which times show as free or busy — for a complete overview of Event Type setup and settings, check out this help center article.
Choose when people can book this event
First, let’s fine-tune when and how often people can book this type of meeting. All these settings live under “Scheduling settings” in the Event Type editor.
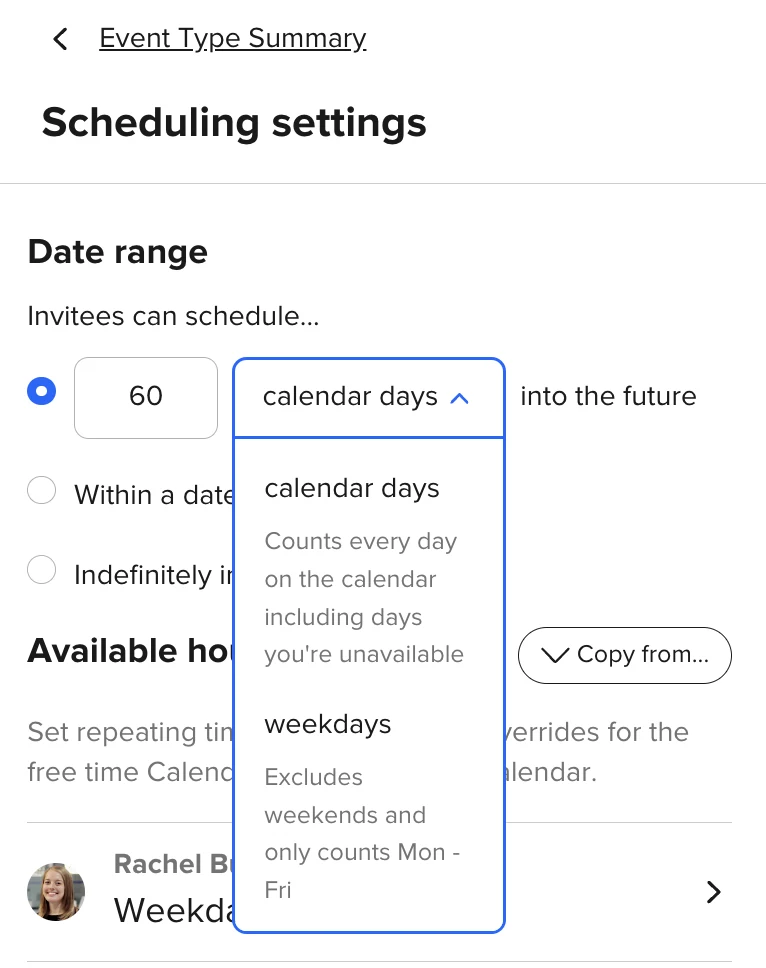
Controlling how far in the future people can book with you can help you stay organized and create urgency for high-priority meetings like sales demos or candidate offer calls. Under “Date range,” set when you want to let people book this Event Type.
You can choose:
A certain number of days into the future
Within a specific date range
Any time in the future
Select a schedule or set custom hours
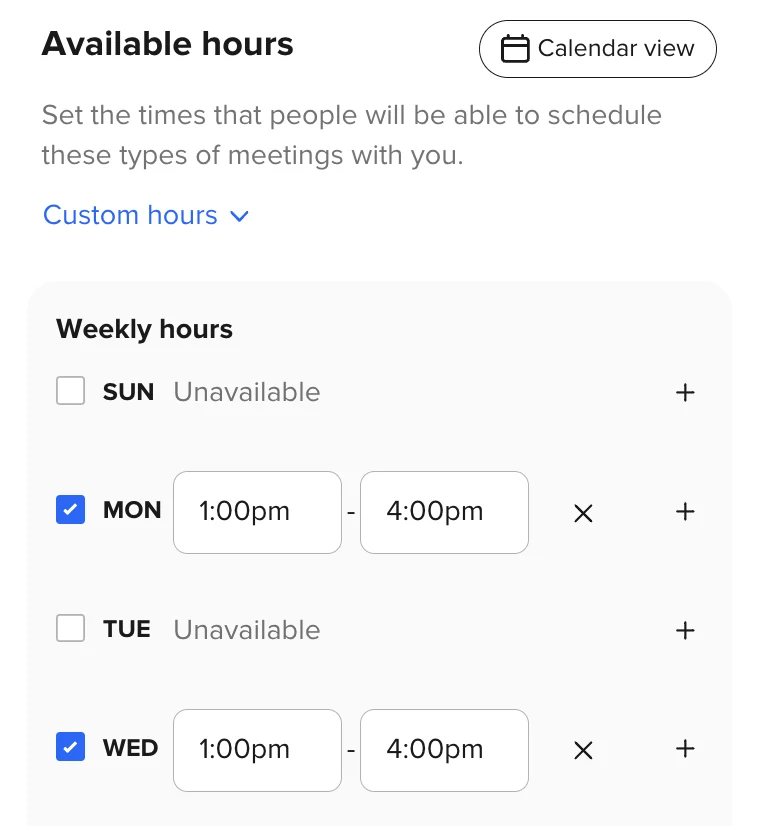
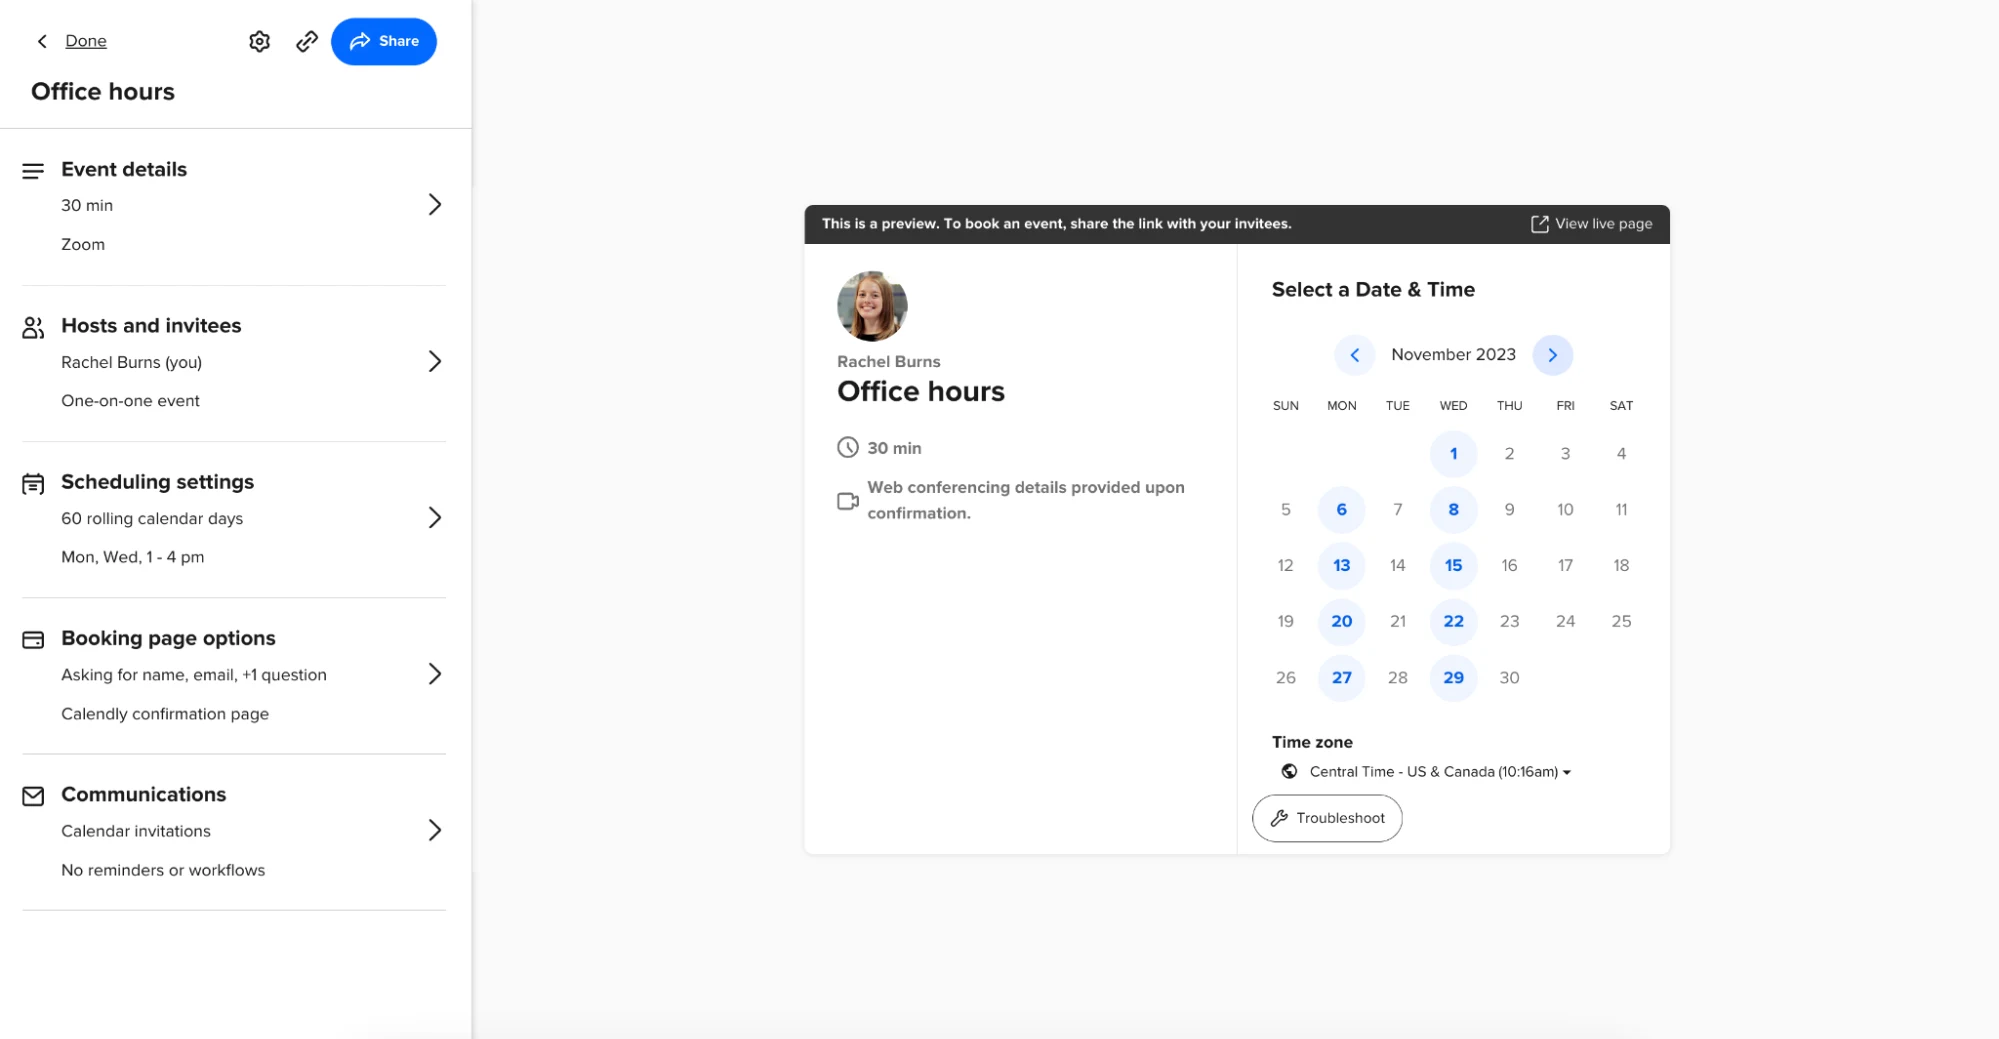
Next, pick which schedule you want to use for this Event Type under “Available hours” in “Scheduling settings”. You can select one of the schedules you set up earlier, or set custom hours specific to this type of event.
For example, if you want to offer office hours on Monday and Wednesday afternoons only, these custom hours will only apply to this Event Type — it won't affect your default schedule.
Add breaks between meetings with buffers
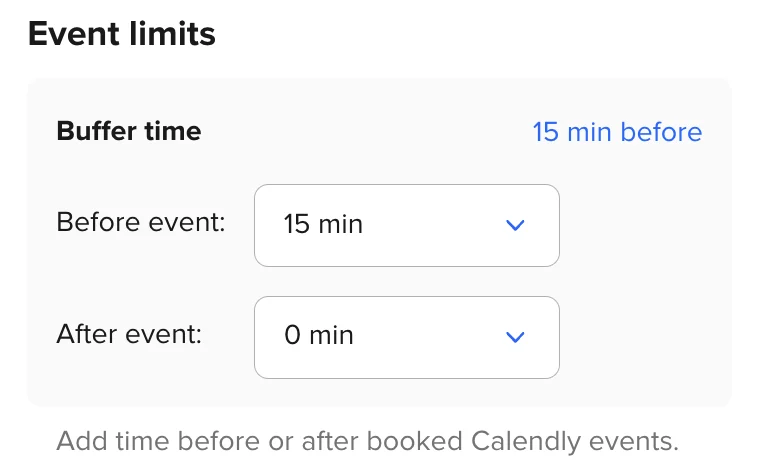
Back-to-back appointments don’t give you enough time between meetings to get ready (or grab another cup of coffee!). Add a buffer to your Event Types to give yourself additional time to review your notes before a call or debrief immediately after.
Under "Event limits” in the “Scheduling settings” section of the Event Type editor, you can set how much time you want automatically blocked off before or after this event. People won't be able to book any meetings with you during those buffer periods. (Note: we recommend adding a buffer either before or after an event, but not both, as that tends to add too many limitations to your availability.)
Prevent last-minute bookings and event overload
There are even more customization options under “Event limits” and “Additional options.” Here you can:
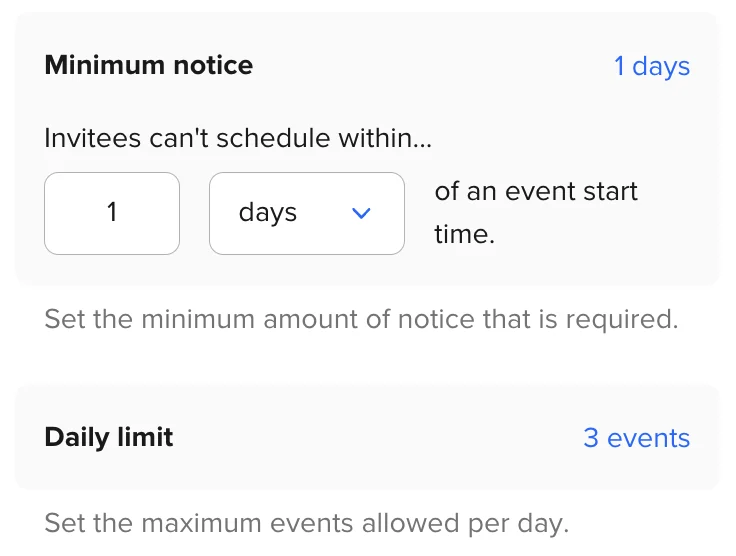
Choose how far in advance people need to book with you and how many events are allowed per day. If you need time to prepare for meetings or just want to avoid last-minute bookings, you can require that people schedule minutes, hours, or days in advance.
Limit the number of times this Event Type can be scheduled per day. Maybe you offer one-on-one coaching that takes a lot of mental energy and preparation — this setting lets you prevent too many of those sessions per day, while still letting people book other types of meetings.
Set the time zone. If you’re meeting in person, you can lock this to the time zone of your event location. Otherwise, Calendly automatically detects your time zones to ensure everyone meets at the correct time.
Set start time increments for the event. The shorter the increments, the more open times people will see on your booking page. For example, if you set 20 minute increments, your time slots will appear as 1:00, 1:20, 1:40, etc.
Learn more about managing additional rules for availability in this help center article.
Create exclusive availability with secret events
Not every meeting type needs to show up on your booking page. You might have regular meetings that discuss sensitive information, are only open to select invitees, or fall outside your regular working hours.
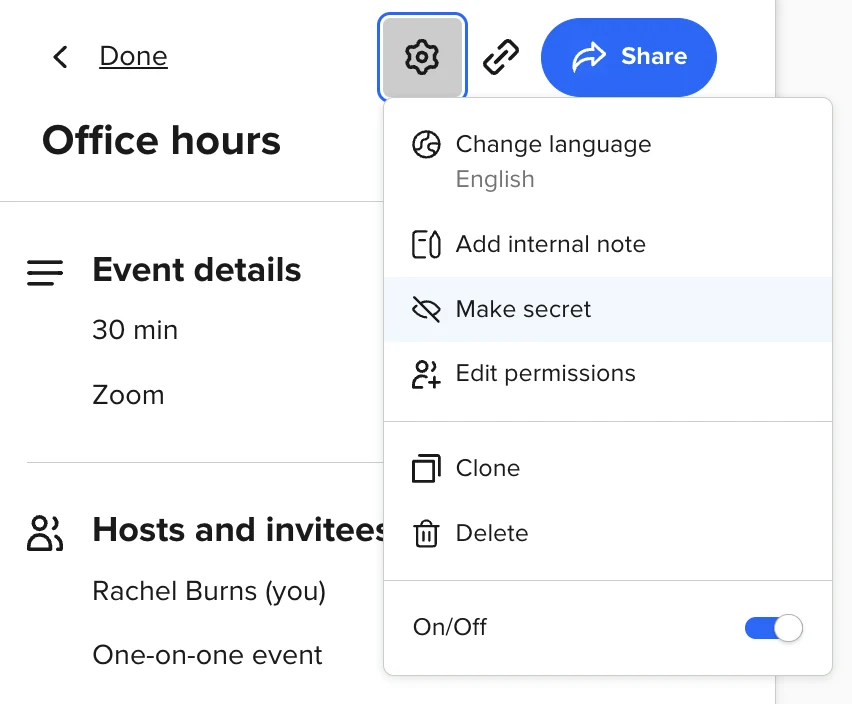
When you use the "secret" setting for an Event Type, the event won’t appear on your main scheduling page. Only people with the Event Type link can see it. To mark an Event Type as secret, click the cog icon at the top of the Event Type editor, then select “Make secret.”
For example, if you offer onboarding sessions to new paying customers, you don’t want just anyone who comes across your scheduling page to be able to book a session. You can make that Event Type secret and send the link directly to customers.
Choose whether invitees can cancel and reschedule events
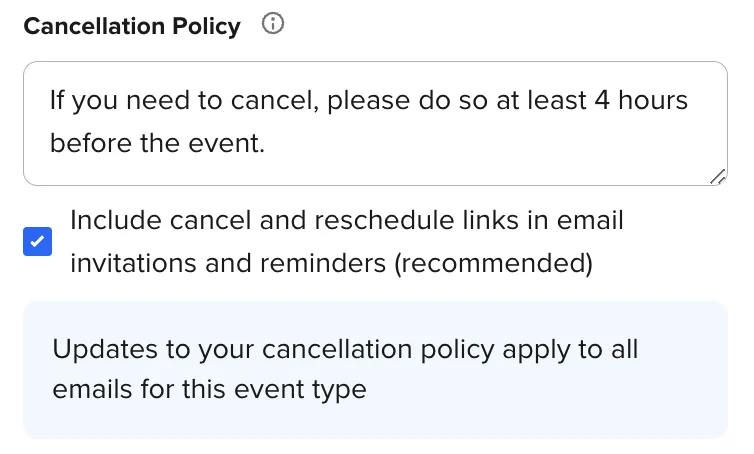
Last but not least, you can decide whether you want to include cancel and reschedule links in event notifications. If you choose to include these links, when someone receives an email reminder about your event, they can cancel or reschedule by clicking the link.
In the Event Type editor, select “Communications,” then, under “Basic communications,” click the three dots next to “Calendar invitations” and click “Edit.” At the bottom of the sidebar, check “Include cancel and reschedule links in email invitations and reminders (recommended).”
You can also add your cancellation policy to let invitees know if and when they can change events. Your policy will be included in any email notifications your invitees receive. (Keep in mind that Calendly can’t enforce cancellation policies, just display them.)
Testing and troubleshooting your availability
Now that you've set up all things availability, it's time to test it out and make sure it’s easy and convenient for people to book with you.
Preview and test your booking pages
Your booking page is what people will see when you send them your Calendly link. You can preview your booking page right from the Event Type editor!
From your Calendly homepage, select the Event Type you want to preview. An interactive preview of your booking page will show in the right pane of the Event Type editor. Test your availability settings by clicking around the calendar and selecting a date and time to book. Edit your Event Type as needed to fine-tune any settings.
You can also preview and test your booking page from the live link by clicking “View live page” above the preview in the Event Type editor, or by clicking “View booking page” from the Event Type tile on your homepage.
Use the Troubleshooting tool to see what’s blocking bookings
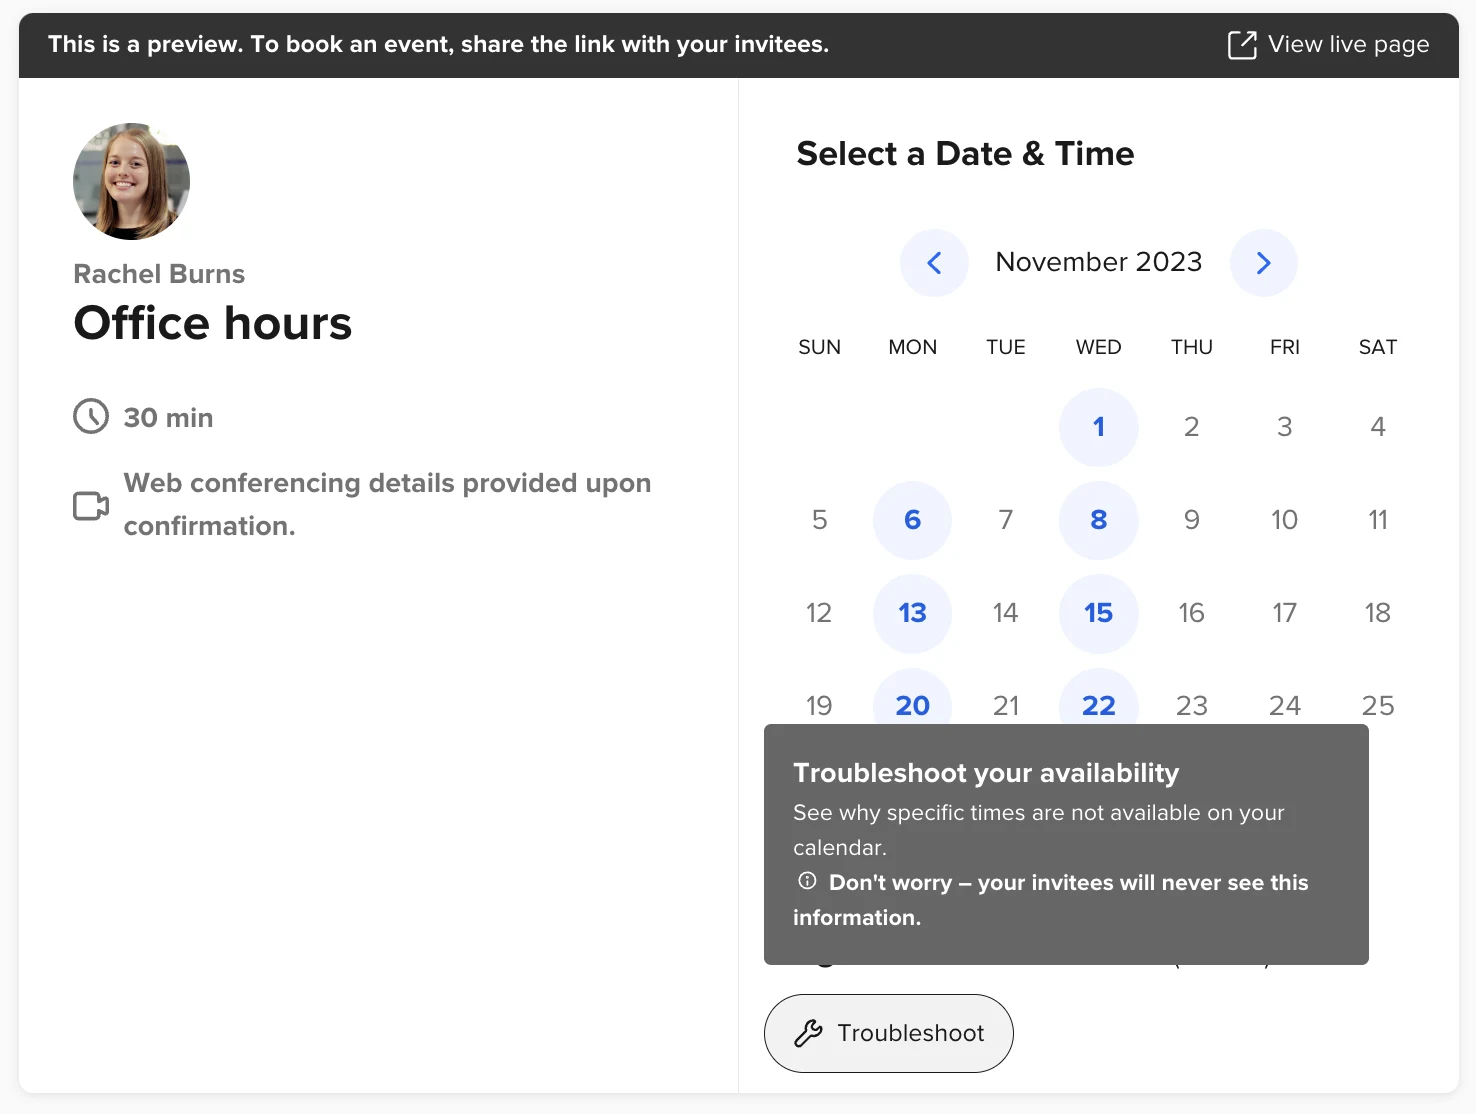
Sometimes your schedule shows you’re unavailable at a certain date and/or time when you’re actually free. If you notice any incorrect time slots, use the Troubleshoot tool at the bottom of the Event Type preview to understand which settings are affecting when you’re free to schedule.
You can also use the Troubleshooting tool on your live booking page. Make sure you're logged in to your Calendly account. You'll find a button to enter troubleshooting mode at the bottom of your Event Type booking page.
Once you’ve discovered why a certain time isn’t available, you can adjust your settings accordingly.
For more details on troubleshooting availability, check out this help center article.
Next steps: Share your scheduling link and start booking!
Now that you’re set up to display the correct times, you’re ready to offer a professional and reliable scheduling experience — without worrying about double booking or manual calendar management.
The next step is to explore the best ways to share your link so people will want to book time with you. Check out this guide to sharing your scheduling link for everything you need to start booking better meetings, from etiquette tips to sharing your link on the go.
Get started with Calendly
Ready to make scheduling easier than ever?
Rachel Burns
Rachel is a Content Marketing Manager at Calendly. When she’s not writing, you can find her rescuing dogs, baking something, or extolling the virtue of the Oxford comma.
Related Articles
Don't leave your prospects, customers, and candidates waiting
Calendly eliminates the scheduling back and forth and helps you hit goals faster. Get started in seconds.
Calendly eliminates the scheduling back and forth and helps you hit goals faster. Get started in seconds.


